Integration
Example project
To test the example project simply open the continuously integrated Itch.io build and either run the WebGL build in your Browser directly or download the Windows build.
You can also install the complete Example project from the main branch for the given Unity version see (Required Software) and after installing it you can download the project and open it in Unity (see Opening a Project in Unity). Then you can start the game with the play button to test the AudioManagers functionalities.
Using AudioManager
To simply use the AudioManager in your own project download the latest release.
Starting from v1.5.0 see (GitHub release) simply open Unity and install the package from the local folder or alternatively add the package via git url.
In older version copy all files included in the release into your Assets folder.
Git package url
Once you’ve completed this step you can now you can easily add sounds like shown in Adding a new sound.
Initalizing Audio Manager
Starting from v1.7.0 see (GitHub release) the project structure has been completly reworked. Therefore intializing the Audio Manager now entails, adding the AudioManagerSettings.CS script onto a GameObject in your scene.
Old Way of initalizing Audio Manager before v1.7.0
Simply attach the AudioManger.CS script onto a local GameObject in your scene.
Reference to Audio Manager script
Starting from v1.7.0 see (GitHub release) the project structure has been completly reworked. It now uses the Service Locator pattern, see (Design) for more info on what that exactly means, therefore using the Audio Manager in your project has been slightly overhauled.
To include and use it in a script first include the needed namespaces. For a simple project that would be AudioManager.Core and AudioManager.Locator. Then simply add a local private variable to hold the IAudioManager instance and then get it with the ServiceLocator.GetService() method.
using AudioManager.Locator;
using AudioManager.Core;

private IAudioManager am;

private void Start() {
    am = ServiceLocator.GetService();
    // Calling method in AudioManager
    am.Play("SoundName");
}
Alternatively you can directly call the methods this is not advised tough, if it is executed multiple times or you’re going to need the instance multiple times in the same file.
using AudioManager.Locator;

void Start() {
    // Calling method in AudioManager
    ServiceLocator.GetService().Play("SoundName");
}
For a more detailed description on all the namespaces and for what specifically they are needed see (Design).
Old Way to add new sounds before v1.7.0
To use the Audio Manager to start playing sounds outside of itself you need to reference it. As the Audio Manager is a Singelton this can be done easily when we get the instance and save it as a private variable in the script that uses the Audio Manager.
private AudioManager am;

void Start() {
    am = AudioManager.instance;
    // Calling method in AudioManager
    am.Play("SoundName");
}
Alternatively you can directly call the methods this is not advised tough, if it is executed multiple times or you’re going to need the instance multiple times in the same file.
void Start() {
    // Calling method in AudioManager
    AudioManager.Play("SoundName");
}
AudioMixer support
Starting from v1.3.0 see (GitHub release), the AudioManager now supports the AudioMixer, meaning sounds can be assigned an AudioMixerGroup which will make it possible to decrease the volume of multiple sounds with one call as long as they are in the same AudioMixerGroup.
Additonally the AudioMixer, even makes it possible to add distortion or other effects to the sounds.
See Audio Tutorial for Unity AudioMixer on how to expose parameters so that they can be changed with the AudioManager.
Adding a new sound
Starting from v1.4.0 see (GitHub release), the AudioManager now relies on ScriptableObjects called AudioSourceSettings with custom UnityEditor code to initaly create a sound. For that you simply create as many AudioSourceSetting as you want too.
This can be done in any folder in the Assets, simply Right-Click –> Create –> AudioManager –> AudioSourceSettings. You can now give your ScriptableObject a name and set its values.
To remark is that the inital state of the AudioSourceSettings is simply 2D functionality.
To enable 3D functionality you have to increase the Spatial Blend setting to more than 0, because this signals how much your sound should be treated as 3D. Where 0 is effectively 2D. Therefore when you increase this to more than 0 additional settings for 3D functionality appear.
Image of 2D AudioSourceSettings | Image of 3D AudioSourceSettings |
|---|---|
 | 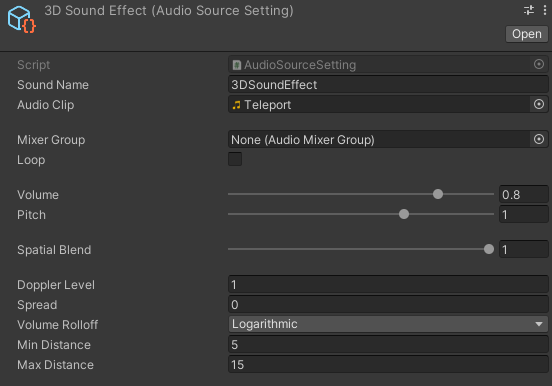 |
Lastly the ScriptableObjects then have to be dragged into the list on the AudioManagerSettings.CS script if using v1.7.0 see (GitHub release) or into AudioManager.CS if using an older version. 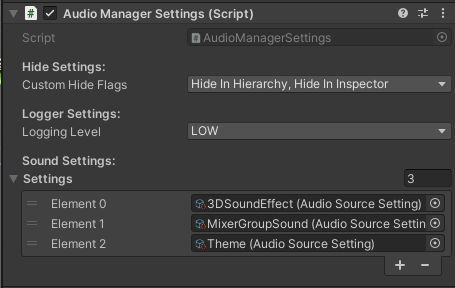
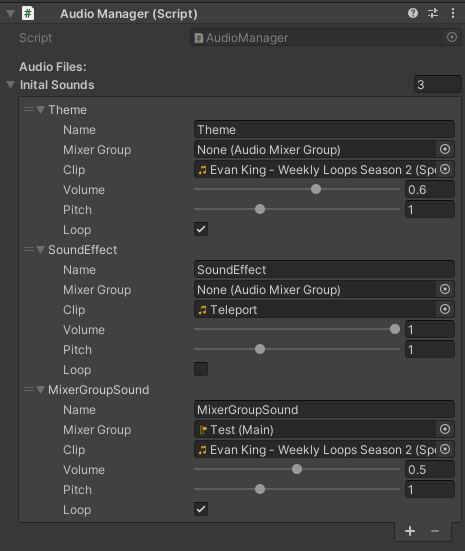
Old Way to add new sounds before v1.4.0
To add a new sound you simply have to create a new element in the Sounds array with the properties:
Name(This is used to reference the sound in the Audio Manager so ensure it’s unique)Mixer Group(AudioMixerGroupthe sound is connected to)Clip(Audio that should be played when starting to play the sound, simply add a audio file that is saved in your Unity Project)Volume(How loud the sound is)Pitch(Distortion of the sound effect, set it to 1 if you wan’t to ensure that it sounds like intended)Loop(Determines if the sound should be repeated automatically after finishing –> Usefull for a theme sound)
Required Software
- Unity minimum
Ver. 2021.3.1f1for downloading and opening the example project in Unity - Unity minimum
Ver. 5.2for the AudioManager - Unity minimum
Ver. 2018.1, when the AudioManager should be integrated via. the package. Possible starting fromv1.5.0see (GitHub release)
Certain parts of this library need different versions:
Ver. 2021.3.1f1–> Because the Example project was made in that version and downgrading to a later version is not possible.Ver. 2018.1–> Because the integration of the package ui was inVer. 2018.1, so before that you can’t install custom packages.Ver. 5.2–> Because the AudioManager code itself relies only on min.Ver. 5.2, because this was when support for both AudioMixer and AudioSource were first added.